~~~~~~~~~~~~~~~~~~~~~~~~~~~~~~~~~~~~~~~~~~~~~~~~~~~~~~~~~~~~~~~~~~~~~~~~~~~~~~~
Version Info
~~~~~~~~~~~~~~~~~~~~~~~~~~~~~~~~~~~~~~~~~~~~~~~~~~~~~~~~~~~~~~~~~~~~~~~~~~~~~~~
--0.1 - May 20, 2006 Started with a complete guide except for the errors soon
to be found or info soon to be contributed.
--0.2 - May 24, 2006 I spotted a few typos and fixed. A few readers have
contributed info to me. I have added the ver. info section. Because of some
unknown PC error, I have replaced most long "----------" with "~~~~~~~~~~" plus
it looks nicer o_O.
-0.3 - Critical update. Fixed typo in parties section (used to say lvl is 35-30).
-0.4 - A few pieces of info put into the guide
-0.5 - a tip how to kill king block gollems and slight changes
-0.6 - Section 4b added containing a unique PQ build
-Final - a small fix, now i am working on Cleric's ludi PQ guide
thanks to all the contributers, and hidden-street.net for putting this up
===============================================================================
Table of Contents
===============================================================================
press ctrl+F and search any of the numbers for the sections 2 times down.
(search 1.1 twice to find the introduction section)
--1. Getting Started maple story powerleveling
1.1 - Introduction
1.2 - What is pq
1.3 - Requirements
1.4 - Is PQ worth the time
--2.Basics of PQ
2.1 - Basic pq terms of speech
2.2 - Parties
2.3 - Going Inside
2.4 - Stages
--3.Ludi PQ indepth
3.1 - Party Reccomendations --ALERT! A "MUST SEE" WARNING IN HERE
3.2 - Rushing
3.3 - Time
3.4 - Tracking
3.5 - Being Leader
3.6 - "Help someone died or d/c'ed"
--4.Assassin's Edge
4.1 - Why are sins so good for PQ maple story powerleveling
4.2 - Damage
4.3 - Accuracy
4.4 - Range
4.5 - Jump attack
4.6 - HASTE!!!
--4b.Assassin's unique PQ build
4b.1 - Why a different build?
4b.2 - advantages/disadvantages
4b.3 - the build
4b.4 - equip-wise
--5.Stage Guide
5.1 - Stage 1 --ALERT! A "MUST SEE" WARNING IN HERE
5.2 - Stage 2
5.3 - Stage 3
5.4 - Stage 4
5.5 - Stage 5 --ALERT! A "MUST SEE" WARNING IN HERE
(ALSO AN AMAZING TIP ON STAGE 5 AREA: HOW TO KILL THE INDESTRUCTABLE KING BLOCKS!)
5.6 - Stage 6
5.7 - Stage 7
5.8 - Stage 8
5.9 - Crack In The Wall (Boss)
5.010 - Bonus
5.011 - Determine to adventure
--6.Prizes
6.1 - Some prizes
--7.Credits
7.1 - Credits
~~~~~~~~~~~~~~~~~~~~~~~~~~~~~~~~~~~~~~~~~~~~~~~~~~~~~~~~~~~~~~~~~~~~~~~~~~~~~~~
1.Getting Started
~~~~~~~~~~~~~~~~~~~~~~~~~~~~~~~~~~~~~~~~~~~~~~~~~~~~~~~~~~~~~~~~~~~~~~~~~~~~~~~
=================================================================
1.1 - Introduction
=================================================================
The Ludibrium Party Quest is a great add-on to Maplestory. After passing level
50 I have made a guide to help people (assassins in general) learn to master
their pq abilities just as I have. This PQ is a whole different attitude
that of the Kerning PQ. With higher levels, means more powerful players and
a chance to test your newly gained 2nd job skills. You will be faced with
new stronger monsters, puzzles, more and longer stages, and stages where
teamwork is critical. Throughout these challenges, you can learn to
cooperate and work together for a quicker, cleaner PQ. maple story powerleveling
=================================================================
1.2 - What is pq
=================================================================
PQ is party quest. It is a quest that can be repeated infinite times for a
certain level range. This quest is not displayed in your quest log, and
takes place in a special group of maps that can be entered through forming
a party. There's a catch though, only one party is allowed in at a time
per channel.
=================================================================
1.3 - Requirements
=================================================================
The requirements to do a Ludibrium party quest are...
Level 35~50
Having a full party of 6
All party members are in Eos Tower Floor 101
=================================================================
1.4 - Is PQ worth the time
=================================================================
YES! a PQ is DEFINETELY worth the 30 minutes or so it takes to complete.
This is an EXTREME save in time training and money wasted on pots. to top
it all off, you get prizes from doing pq.
Is it worth the time to GET IN a pq... thats all up to your leader's
clicking.
~~~~~~~~~~~~~~~~~~~~~~~~~~~~~~~~~~~~~~~~~~~~~~~~~~~~~~~~~~~~~~~~~~~~~~~~~~~~~~~
2.Basics of PQ
~~~~~~~~~~~~~~~~~~~~~~~~~~~~~~~~~~~~~~~~~~~~~~~~~~~~~~~~~~~~~~~~~~~~~~~~~~~~~~~
=================================================================
2.1 - Basic pq terms of speech
=================================================================
Since some people didnt do kerning pq much, i made this section to help
those people with pq "slang".
PQ - "Party Quest"
Looking for/Joining pq - "I want to join a party quest"
(lvl 46 sin looking for pq)
Track (noun) - "The name of a person in pq you /find so you know their stage"
(whats the track's name?)
Track (verb) - to type in /find and check the people inside's stage"
(u guys keep tracking and tell me when 8th)
Rush - To exit a party quest and get back in the same channel right away.
(If we try to rush we might miss)
Miss - Another party gets in pq and not yours.
(I saw them go in, we missed)
Solo - Kill by oneself with no assistance. mostly refering to bosses
(I'll solo 1st rombot in stage 7)
d/c - d/c simply stands for disconnect
(One of our members d/ced, go get another)
AC or Autoclicker - AC was a program that clicks automatically super fast.
IS CONSIDERED A HACK AND CANNOT BE USED NOW.
(I heard that guy has ac by using bypass)
=================================================================
2.2 - Parties
=================================================================
The Ludibrium party quest consits of a party with 6 members (the leader
counts as a member). These parties have to be with members levels 35-50.
The party must be in the same room for the leader to click the npc that
takes you in pq. You can join a party by finding people who say
"looking for pq members" and asking them to invite you. Also by you
saying "looking for pq", eventually you will get invited to a party.
=================================================================
2.3 - Going Inside
=================================================================
To enter the Ludibrium Party quest, if you are leader, have a party of 6 and
have them all be Eos Tower floor 101. Make sure they are all lvl 35-50. then
wait for your track to get to "A crack in the wall" here you need to be
ready. As soon as that party reaches Bonus, you click ALOT VERY VERY FAST.
another note... to click very fast, double click the red sign in eos 101
and move the window so the ok button is on top of the sign. then click in
that spot alot.
=================================================================
2.4 - Stages
=================================================================
Ludi pq is longer, unlike the kerning pq. This has 8 main stages, 1 boss
stage, and 2 bonus-style stages (also one exit stage for when you die).
-Stage 1 is killing monsters and collecting passes.
-Stage 2 is breaking boxes and collecting dropped passes
-Stage 3 is breaking boxes, then the boxes summon 3 blocktopus, kill and
collect all the passes.
-Stage 4 is entering darkened rooms and killing special monsters with
different defense capabilities (some magic weak some physical weak)
-Stage 5 is towers you have to climb to break boxes and collect passes
-Stage 6 is a puzzle to get from one place to another (like utah's farm)
-Stage 7 is killing weak monsters that spawn rombots then killing rombots
-Stage 8 is similar to kerning stage 4, exactly same except needs 5 members
and is harder to jump through
-Boss stage is, kill a dirty rat and it spawns the boss alishar. kill alishar,
and give keys (alishar drops) to leader
-Bonus stage is breaking boxes and collecting prizes from them.
-Determine to adventure(2nd bonus) is talk to the npc, and he gives you your
REAL prize of stuff like a scroll.
-the exit stage is when you die or have to leave during pq, you get taken here
~~~~~~~~~~~~~~~~~~~~~~~~~~~~~~~~~~~~~~~~~~~~~~~~~~~~~~~~~~~~~~~~~~~~~~~~~~~~~~~
3.Ludi PQ indepth
~~~~~~~~~~~~~~~~~~~~~~~~~~~~~~~~~~~~~~~~~~~~~~~~~~~~~~~~~~~~~~~~~~~~~~~~~~~~~~~
=================================================================
3.1 - Party Reccomendations --ALERT! A "MUST SEE" WARNING IN HERE
=================================================================
I reccomend having a party of all lvl 40+. Have at least one cleric and also
one sin (you).
~~~~~~~~~~~~~~~~~~~~
READ THIS v
~~~~~~~~~~~~~~~~~~~~
There are 3 areas that are REQUIRED to do a pq.
1.A thief with dark sight to do bottom of stage 5
2.A magician with teleport to do top of stage 5
3.An assassin or bowman with maxxed range skill to summon monsters in stage 7.
~~~~~~~~~~~~~~~~~~~~
READ THIS ^
~~~~~~~~~~~~~~~~~~~~
An assassin is GREAT because they cover both reasons 1 and 3. Then also a
cleric is great because wizards are literally useless at boss stage. clerics
cover reason 2 AND can heal the undead monsters that boss summons and heal
the party.
Best jobs for pq:
1. Assassin 40+
2. Cleric 40+
3. Bandit 45+
4. Spearman 45+ (with HB)
5. Bowmen(both types) 45+
6. Fighter 45+ (with or without rage, but preferred if over +5atk)
7. Page 45+
8. Wizard(either) 40+
9. Perma Beginners(lol. this would just be funny)
I'm not saying wizards are completely useless. They can be used in stage 5
in top portal and 4 in the top three portals if you cannot find a cleric.
A quick tip sent by reader:
It is great when a bandit who thought ahead for PQ gets involved. At first a
bandit is the slower of the two, which he is, but after five points into
haste a beautiful skill called steal is unlocked. Yes, beautiful. Yes adding
zounds of points into is a complete waste, but one point is enough to get
a 11% chance to steal an "extra ticket." Let me repeat this an "extra
ticket" this is a ticket that is taken from a living monster. No it doesn't
stop the monster from dropping one at its death too, so what you have is
two tickets from every monster. You may say "oh 11% that will take years."
I don't disagree with you, but it is a percentage making it a wild card. :(
For some strange reason I get a ticket within the first 10 hits, figures
with 11% "you will steal 1 out of every 10 hits." This is just a tip from
a bandit, I am really tired of getting down played and forlorened by every
other job.
-Dont worry dude. Everyone loves both types of thiefs for pq. Both sins
and bandits got power, which helps at Alishar, and Dark sight which helps
at stage 5. ^_^
=================================================================
3.2 - Rushing
=================================================================
Rushing has been eliminated from a fully completed pq. Since another party
can enter during bonus, you can't rush. There are 2 possible ways to rush.
The first is send 3 members out to save names o people incase you miss.
This also might eliminate some parties' tracks. Then when they least expect
it, have your leader exit and try to clik again ALOT and try to get back in.
=================================================================
3.3 - Time
=================================================================
Ludi pq gives you 1 hour to complete, so it will also take longer to do so.
This is more than enough time because an average pq takes from 30~40 minutes.
=================================================================
3.4 - Tracking
=================================================================
The best and most effective way to get a track is to remmber or record names
from previous tracks. Also, take screenshots and later /find each person in
it. After about a week after you start pqing alot, you might be able
to get a track off the top of your head =)
=================================================================
3.5 - Being Leader
=================================================================
Being The leader of a pq takes alot of responsibility. You have to be able
to click very fast to get your party in the party quest. Then you have to
be very experienced in pq to know what and what not to do/make your members do.
You are also responsible for getting the right type of members, like choosing
a cleric over a wizard. When you are in pq you must keep your party
cooperating and not fighting for spots and such.
=================================================================
3.6 - "Help someone died or d/c'ed"
=================================================================
If someone died, dont panic. A party quest might require six to enter, but
only requires 5 to do the stages. You will need 5 to do stage 8. After stage 8
any amount of people can die, except the leader and 1 person.
~~~~~~~~~~~~~~~~~~~~~~~~~~~~~~~~~~~~~~~~~~~~~~~~~~~~~~~~~~~~~~~~~~~~~~~~~~~~~~~
4.Assassin's Edge
~~~~~~~~~~~~~~~~~~~~~~~~~~~~~~~~~~~~~~~~~~~~~~~~~~~~~~~~~~~~~~~~~~~~~~~~~~~~~~~
=================================================================
4.1 - Why are sins so good for PQ
=================================================================
1. They are NEEDED to actually complete a pq, unless u wanna waste 2 spaces on
a bandit + bowman 2. because they are so strong and fast, and 3.
because of HASTE!!! These will be explained individually in the next
sections
=================================================================
4.2 - Damage
=================================================================
Yes. Sins are very strong. They can be made even stronger by rich people with
better stars and claws. a lvl 50 sin could possibly do like 3k dmg! A group
of sins lvl 45+ could totally OWN alishar in about 1 minute.
=================================================================
4.3 - Accuracy
=================================================================
This is where accuracy counts. Being able to hit alishar is one of many
places where sins and bowmen triumph over all. An assassin almost never
misses alishar, and have no need for sniper potions. It's all natural
ability :)(except maybe 3x newbies)
=================================================================
4.4 - Range
=================================================================
Range is something very important in pq. Not only in boss stage but it is
used in stage 7. That stage requires max range to complete. You might
say "sure any ol bowman could do that" but read the next section.
=================================================================
4.5 - Jump attack
=================================================================
This (along wth booster) is what makes sins the absolute best at hitting
targets and not getting hit themselves. They cna jump to the target's
range, swiftly shoot a powerful pair of stars, and jump back before
the enemy has time to start attacking.
If you STILL think assassins equal to bowmen in pq read the NEXT section.
=================================================================
4.6 - HASTE!!!
=================================================================
Haste is a skill used by thiefs that makes the party move FAST! this
is why sins are loved the most. Sins get this skill higher usually
before bandits do. Add this to booster and jump attack. Sins are
already so fast, this just makes them even faster.
~~~~~~~~~~~~~~~~~~~~~~~~~~~~~~~~~~~~~~~~~~~~~~~~~~~~~~~~~~~~~~~~~~~~~~~~~~~~~~~
4b.Assassin's unique PQ build
~~~~~~~~~~~~~~~~~~~~~~~~~~~~~~~~~~~~~~~~~~~~~~~~~~~~~~~~~~~~~~~~~~~~~~~~~~~~~~~
=================================================================
4b.1 - Why a different build?
=================================================================
Those guides that all say "critical first" i think of them as a
piece of trash. That is TOTALLY not the right way to go, pq or
no pq. This build here is a specialy one for an assassin to be
the best PQ'er he can.
=================================================================
4b.2 - Advantages/disadvantages
=================================================================
This build will allow you to be faster, and more liekd in parties
at lower levels. It is all great except it doesnt exactly let u
do 2k dmg anytime soon. You will stick with 1k then at level 40
or so slowly gain up.
=================================================================
4b.3 - the build
=================================================================
Level 30- 1 endure
Level 31- (u shuld lvl from 30-31 in kerning pq) 3 mastery
Level 32- 2 mastery(5) now 1 booster
Level 33- 1 booster 2 haste
Level 34- 3 haste
Level 35- 3 haste
Level 36- 2 haste(10) now 1 critical
Level 37- 3 critical
Level 38- 3 critical
Level 39- 3 critical
Level 40- 3 Critical
Level 41- 2 critical(15) 1 booster
Level 42- 3 haste
Level 43- 3 haste
Level 44- 3 haste
Level 45- 1 haste(MAX) 2 critical
Level 46- 3 critical
Level 47- 3 critical
Level 48- 3 critical
Level 49- 3 critical
Level 50- 1 critical(MAX) 2 mastery
---------here ends pq but the guide goes on---------
Level 51- 2 endure 1 drain(for fun)
Level 52- 3 mastery
Level 53- 3 mastery
Level 54- 3 mastery
Level 55- 2 mastery(MAX) 1drain
Level 56- 3 drain
Level 57- 3 drain
Level 58- 2 booster(5) 1 drain
Level 59- 3 drain
Level 60- 3 drain
Level 61- 3 drain
Level 62- 3 drain
Level 63- 3 drain
Level 64- 3 drain
Level 65- 3 drain(MAX)
Level 67- 3 booster
Level 68- 3 booster
Level 69- 3 booster
Level 70- 3 booster(17)
You end with
3 endure
20 mastery(MAX)
30 critical(MAX)
20 haste(MAX)
30 drain(MAX)
17 booster
=================================================================
4b.4 - equip-wise
=================================================================
This section explains some equip stuff for the unfunded sin
by unfunded i mean having 5m instead of 30m like most of them
at level 35 get maple claw+7 (u shuld have icys)
at level 40 get adamantium/dark avarice+7 (u shuld have 3 icys)
at level 43 get a kandayo+7(if u got the money only)
at level 45 you should have tobis and perhaps a lower attack w/g
at level 50 you should have a 35 attack any color slain
-and a 4 atk w/g if u can afford (at least 1 tobi too)
at level 55 i had a 35 slain, a 3 atk w/g
as for stars. have 1 tobi, 1/or2 icys, and about 5 kumbis
if u want instead get 3 kumbies and get some mokbis/tops
so u dont run out too much
~~~~~~~~~~~~~~~~~~~~~~~~~~~~~~~~~~~~~~~~~~~~~~~~~~~~~~~~~~~~~~~~~~~~~~~~~~~~~~~
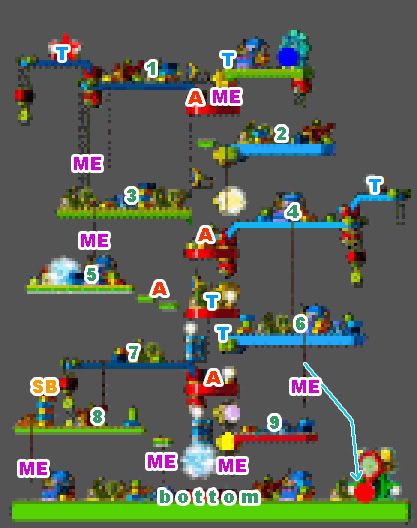
5. Stage Guide
~~~~~~~~~~~~~~~~~~~~~~~~~~~~~~~~~~~~~~~~~~~~~~~~~~~~~~~~~~~~~~~~~~~~~~~~~~~~~~~
Just a quick note, this guide is from an assassin's point of view, and
is how to do pq with an assassin.(in this guide, lets pretend u'r the only
thief here so no fighting for spots)
Also, for full understanding, follow the guide in order.
=================================================================
5.1 - Stage 1 --ALERT! A "MUST SEE" WARNING IN HERE
=================================================================
YAY! you got in pq. now first of all DON'T MOVE! read the following.
~~~~~~~~~~~~~~~~~~~~
READ THIS v
~~~~~~~~~~~~~~~~~~~~
DO NOT! I MEAN DO NOT CLICK THE TOY SOLDIER THAT'S IN PQ! Clicking him will
make you exit pq. and just WHO would want that?
~~~~~~~~~~~~~~~~~~~~
READ THIS ^
~~~~~~~~~~~~~~~~~~~~
Ok, lets begin. First of all, use whatever haste you have, booster, and a
warrior pill. Now go up the tower. Kill these ratz and dirty ratz around you.
You will notice, they are stronger, have more hp, and give more exp. Once all
the enemies are dead, all the party members should give all the passes to
the leader. Then arrange who will go to the next stage first (2 people) to
to tower's trap(see stage 2). Let's say this time, you and some guy are
selected to go.
Monster Info:
Ratz from another dimension
~~~~~~~~~~~~~~~~~~~~~~~~~~~~~~~
Level:32
Experience:260
HP:3,700
Accuracy:80
Avoidability:13
Weapon Attack:112
Weapon Defense:85
Magic Defense:95
Dirty ratz from another dimension
~~~~~~~~~~~~~~~~~~~~~~~~~~~~~~~
Level:34
Experience:280
HP:4,300
Accuracy:90
Avoidability:14
Weapon Attack:125
Weapon Defense:95
Magic Defense:95
=================================================================
5.2 - Stage 2
=================================================================
Here, you and another person have entered (see stage 1). Make your way slightly
lower to the 2nd blue box from the top. Break that one. You will be sent to
"Tower's Trap". There, give an ok to go to your members through party chat.
Head up the tower and break the boxes to get the passes. Head out and give the
passes to your leader. Here your leader will click on the baloons and open the
portal to the next stage, enter it.
=================================================================
5.3 - Stage 3
=================================================================
This time you start near the middle of the map. First haste your members and
either head up or down. Up will require about 2 people. The bottom will require
3-4 people. Break the boxes to summon 3 bloctopus. Kill them to obtain tickets.
The top part will have about 3-4 of them per floor, while the bottom will have
at the very bottom, 9 of them (sins arent good with big mobs). After all of the
enemies have been eliminated, give the passes to your leader. Then the leader
clicks on the baloons to open the portal to the next stage, go in.
Monster Info:
Blocktopus from another dimension
~~~~~~~~~~~~~~~~~~~~~~~~~~~~~~~
Level:35
Experience:288
HP:4,900
Accuracy:100
Avoidability:15
Weapon Attack:115
Weapon Defense:125
Magic Defense:150
=================================================================
5.4 - Stage 4
=================================================================
Here, there are 5 portals. EXCLUDING the VERY top and VERY bottom. the top 3
portals are for a mage to do. Those monsters in there ae weak to magic but darn
strong to....everything else These monsters have sorta sad eyes. The bottom 2
portals are resistant to magic, but physically are weak. These monsters have
sorta mad eyes. The 4th portal has 2 monsters. This means there are 6 passes
in total. Give your pass or passes to the leader and contine to the next
stage when the portal opens.
Monster Info:
Dark eye from another dimension
~~~~~~~~~~~~~~~~~~~~~~~~~~~~~~~
Level: 43
Experience: 340
HP: 6,500
Accuracy: 120
Avoidability: 18
Weapon attack: 130
Weapon defense: 70
Magic defense: 470
-Strong against ice
-Strong against lightning
-Strong against fire
-Strong against holy
Shadow eye from another dimension
~~~~~~~~~~~~~~~~~~~~~~~~~~~~~~~
Level: 43
Experience: 340
HP: 7,100
Accuracy: 120
Avoidability: 18
Weapon attack: 130
Weapon defense: 470
Magic defense: 70
=================================================================
5.5 - Stage 5 --ALERT! A "MUST SEE" WARNING IN HERE
=================================================================
Here is one of the places where being a sin is critical to doing a PQ. First
of all, haste your party members, then head near the rope you see right when
you start.
~~~~~~~~~~~~~~~~~~~~
READ THIS v
~~~~~~~~~~~~~~~~~~~~
DO NOT GO DOWN THIS ROPE YET! Those down there are no ordinary king block
golems. They are indestructible, doing a damage of OVER 7000! NOT A TYPO!
First, go into dark sight and then go down. enter the portal you see.
~~~~~~~~~~~~~~~~~~~~
READ THIS ^
~~~~~~~~~~~~~~~~~~~~
You have entered "tower's Maze". Here, you will find several floors, each
containing a few king block golems. The only way to make it through is with
dark sight. Use dark sight to dodge the golems and then reach the safe floor.
Break the box and collect the passes. Then go in dark sight again and head
up past the golems. Repeat this process until you are at the top and have the
last pass. You should finish with 4 passes. Head out the portal on top and
dark sight past the beginning golems. then head safely near the baloons and
give your passes to your leader. The leader will then click on the baloons
and open the portal to the next stage.
~~~~~~~~~~~~~~~~~~~~~~~~~~~~~~~~~~~~~~~~~~~~~~~
Amazing tip:
when a cleric or 2 manage to jump down off the rope to get to the platform
below, and an hp-pure page/fighter with maxed power guard stays on the rope
just below the king block gollems, having the clerics spam heal him, he can
touch the King block gollems to death, killing them with his Power Guard.
-hb would help too, and a pure hp fighter would do best, they have more hp
thanks for the tip michael
~~~~~~~~~~~~~~~~~~~~~~~~~~~~~~~~~~~~~~~~~~~~~~~
Monster Info:
King block golem from another dimension
~~~~~~~~~~~~~~~~~~~~~~~~~~~~~~~
Level: unknown (estimated 200)
Experience: 800 to each member or around it
HP: 99,000
Accuracy: UNavoidable
Avoidability: Impossible to hit
Weapon Attack: Unknown, dmg=7000+
Weapon Defense: unknown, cant be hit
Magic Defense: unknown, cant be hit
=================================================================
5.6 - Stage 6
=================================================================
This stage gives nothing and has no monsters. It is simply a puzzle with
a never-changing combination. Go on top of the box with a number and
press up to use the box. The code for them is...
133 221 333 123 111
Once up top, just enter the portal and head to stage 7
=================================================================
5.7 - Stage 7
=================================================================
(haste + booster recommended)
More monsters await in stage 7. Head up the rope you see to the left. From that
spot, slowly turn right to the tip and kill the first ratz there. Then head up
and be ready to kill the dirty ratz that is there. Once the party has killed
the first rombard kill the dirty ratz. Then head to the third floor. When
the party finishes off the 2nd rombard, kill the bloctopus to spawn the 3rd
and final rombard. As soon as the bloctopus dies, head quickly down to the
bottom of the map and help kill the rombard. Jump attack to avoid the magic
attack. Beware, rombard summons block golems when it is weak. After all passes
are obtained by the leader, he/she clicks the baloon to enter the next stage.
Monster Info:
Ratz from another dimension
~~~~~~~~~~~~~~~~~~~~~~~~~~~~~~~
Level:32
Experience:260
HP:3,700
Accuracy:80
Avoidability:13
Weapon Attack:112
Weapon Defense:85
Magic Defense:95
Dirty ratz from another dimension
~~~~~~~~~~~~~~~~~~~~~~~~~~~~~~~
Level:34
Experience:280
HP:4,300
Accuracy:90
Avoidability:14
Weapon Attack:125
Weapon Defense:95
Magic Defense:95
Blocktopus from another dimension
~~~~~~~~~~~~~~~~~~~~~~~~~~~~~~~
Level:35
Experience:288
HP:4,900
Accuracy:100
Avoidability:15
Weapon Attack:115
Weapon Defense:125
Magic Defense:150
Block golem from another dimension
~~~~~~~~~~~~~~~~~~~~~~~~~~~~~~~
Level:40
Experience:408
HP:6,500
Accuracy:150
Avoidability:12
Weapon attack:145
Weapon defense:130
Magic defense:110
Rombard from another dimension
~~~~~~~~~~~~~~~~~~~~~~~~~~~~~~~
Level:47
Experience:850
HP:33,000
MP:220
Accuracy:150
Avoidability:18
Weapon attack:175
Weapon defense:185
Magic attack:195
Magic defense:200
as you can see, there are 2 monsters you might mistake.
Rombard, is PQ's stronger version of Rombot. They're not
the same one.
=================================================================
5.8 - Stage 8
=================================================================
This is the final main stage. Very similar to Kerning PQ's 4th stage. The
difference is this puzzle needs 5 people to complete. Snowshoes are recommended
for this stage, especially if you are number 4 or 5. Jumping is pretty tricky
here and you will need to learn how to pwn this stage by experience. The boxes
are aligned like this
12
345
6789
Most parties go in a certain order, which is self explanitory. Here is the list
of possibilites in order from what you should try first to last.
12345, 12346, 12347, 12348, 12349, 12356, 12357, 12358, 12359, 12367, 12368,
12369, 12378, 12379, 12389, 12456, 12457, 12458, 12459, 12467, 12468, 12469,
12478, 12479, 12489, 12567, 12568, 12569, 12578, 12579, 12589, 12678, 12679,
12689, 12789, 13456, 13457, 13458, 13459, 13467, 13468, 13469, 13478, 13479,
13489, 13567, 13568, 13569, 13578, 13579, 13589, 13678, 13679, 13689, 13789,
14567, 14568, 14569, 14578, 14579, 14589, 14678, 14679, 14689, 14789, 15678,
15679, 15689, 15789, 16789, 23456, 23457, 23458, 23459, 23467, 23468, 23469,
23478, 23479, 23489, 23567, 23568, 23569, 23578, 23579, 23589, 23678, 23679,
23689, 23789, 24567, 24568, 24569, 24578, 24579, 24589, 24678, 24679, 24689,
24789, 25678, 25679, 25689, 25789, 26789, 34567, 34568, 34569, 34578, 34579,
34589, 34678, 34679, 34689, 34789, 35678, 35679, 35689, 35789, 36789, 45678,
45679, 45689, 45789, 46789, 56789.
Yes I know what you must be thinking. That there are SO MUCH
combinations, but when you play through it, it takes less than it looks like.
this is how its done if you dont already know.
people get on 1/2/3/4/5
the person on 5 moves to 6
then he/she moves to 7, and so on.
once he/she has reached to 9 and the combination was invalid, the "#4 person"
moves to 5, and the last person moves to 6
once you're down to 1/2/3/8/9, the #3 goes to 4, the 8 goes to 5, and the
9 goes to 6, making it 1/2/4/5/6.
the pattern continues. once its down to 1/2/7/8/9, the #2 goes to 3.
This is complicated to read & learn and must be personally seen/done.
Once you get the right combination, the portal to the boss stage will open.
Enter it.
=================================================================
5.9 - Crack In The Wall (Boss)
=================================================================
This is the "hardest" part of Ludi PQ, the boss, Alishar. Before you do
anything, make sure you are ready, then kill the dirty ratz that is in the
platform whree the box is. Let the pass fall on the box and Alishar will be
summoned. Make sure you are hasted, have booster, used a warrior pill/pot, and
a sniper pill if you are below level 40 just incase. When it has been summoned
nonstop jump attack with lucky seven. Do a back attack when it goes near you
will be out of its magic attack range. As it is weakened, it will summon
chronos, then platooon chronos, then master chronos. Keep attacking alishar
and use cure pots when you are cursed. I don't recommend all cure pots, for
that is a waste. Instead, in path of time, buy holy waters and eyedrops.
When Alishar dies, let your leader get the keys he drops. Then he/she will
talk to the baloon and be sent to bonus stage.
A quick tip sent by a reader:
Stand on the ledge where the NPC baloon is and attack from there nonstop.
He also noted, Do not count on a cleric for heal. ALWAYS have pots with
you. A cleric can get cursed, and if he/she uses magic guard, his/her
MP will run out very quickly.
-I agree with the cleric part. I personally think most clerics run away
from Alishar when he gets close. I've never depended on a cleric and
always used pots i get from determine stage.
and another:
Put cure potions on quickslot or a slot where its NEAR YOUR ATTACK SKILL
SLOT. Thats saves time.
like I put Lucky Seven on X, put it on c. hav it
near the button. bring at least the amount of pots for LV4X.
100 White potions
150 mana pills.
Aviod attacking chronos by all means of jump shoting. They are pretty
annonying even you stand the top part where the sin shoots star for the rat.
700 Damage and 150 damage extra?
-o_O most global players have different key sets than u msea guys. and using
cure pots so quickly is not so urgent, because u almost never get cursed.
I'd say the best way to defeat alishar IS jump attack but its backwards
jump attack specifically. It's pretty complicated but assassin players
should understand...When u do a jump atk(backwards) wait until the peak
of the jump to attack (with booster of course) this is the technique used
to attack tall monsters in a mob or the farthest away in a mob. this will
probably leave u not being able to move for half a second on the ground
but since its a BACKWARDS jump attack it keeps you out of the enemy's
attack range.
Monster Info:
Alishar
~~~~~~~~~~~~~~~~~~~~~~~~~~~~~~~
Level: 56
Experience:4800
HP:125,000
MP:2500
Accuracy:160
Avoidability:26
Weapon attack:280
Weapon defense:210
Magic attack:260
Magic defense:240
=================================================================
5.010 - Bonus
=================================================================
Here, you will have 1 full minute to break boxes. Then the boxes will drop
mesos, and strong potions. Sometimes they will drop Any color Napoleons',
and lvl 40 or 50 earrings. The stats are not always avg. Please be considerate
and do not steal what your party members have gotten from one of their boxes.
After your minute is over, (actually a few more seconds than 1 minute) you
will be transported to another map called Determine To Adventure.
=================================================================
5.011 - Determine to adventure
=================================================================
Climb up to the top where you will see an NPC there. Make sure you have at
least 1 slot in etc, use, and equip. Then click on the npc. say next, or yes to
whatever he asks you. You will be taken back to Eos Tower floor 101 and you
will be given a prize. Congradulations, you have completed the treacherous
Ludibrium Party Quest.
~~~~~~~~~~~~~~~~~~~~~~~~~~~~~~~~~~~~~~~~~~~~~~~~~~~~~~~~~~~~~~~~~~~~~~~~~~~~~~~
6.Prizes
~~~~~~~~~~~~~~~~~~~~~~~~~~~~~~~~~~~~~~~~~~~~~~~~~~~~~~~~~~~~~~~~~~~~~~~~~~~~~~~
=================================================================
6.1 - Some prizes
=================================================================
Here is a list of prizes that "I" know of you can get in the Ludi PQ. There may
be more prizes i don't know of.
Earrings:
Cat's eye (also in determine)
Blue moons
Skull earrings
Red heart earrings
Capes:
in bonus only
------------------
Black Napoleon's
White Napoleon's
Green Napoleon's
Blue Napoleon's
Red Napoleon's
in determine only
-------------------
Black Justice cape
White Justice cape
Red Justice cape
Blue Justice cape
Potions:
in bonus only
-------------------
Elixir
Power Elixir
Grape Juice
Ornage Juice
Ice Cream Pop
Red Bean Sundae
Sunrise Dew
Sunset Dew
Watermelon
in determine only
--------------------
100 white potions
100 white pills
100 blue potions
100 blue pills
10 elixir
Scrolls:
60%
i only know of these scrolls but there are probably more
Helm HP
Helm Def
Cape MP
Cape Def
Cape Mdef
Cape STR
Cape INT
Cape DEX
cape LUK
Overall STR
Overall DEX
Overall LUK
Overall INT
Earring Int-
Overall Def-
10%
Glove Atk-
Bottomwear Def-
100%
glove Atk
The ones with an - at the end are the ones sent in by ackmard, a contributer.
~~~~~~~~~~~~~~~~~~~~~~~~~~~~~~~~~~~~~~~~~~~~~~~~~~~~~~~~~~~~~~~~~~~~~~~~~~~~~~~
7.Credits
~~~~~~~~~~~~~~~~~~~~~~~~~~~~~~~~~~~~~~~~~~~~~~~~~~~~~~~~~~~~~~~~~~~~~~~~~~~~~~~
=================================================================
7.1 - Credits
=================================================================
I have used the following sources for the making of this guide.
http://www.hidden-street.net
http://www.hidden-street.net's Ludi PQ guide
http://www.hidden-street.net/guides/general_002.txt
http://www.sauna.gibbed.us
Most of the stages part was made with my own knowledge and experience, while
the monster info and such was madfe with the help of others.
~~~~~~~~~~~~~~~~~~~~~~~~~~~~~~~~~~~~~~~~~~~~~~~~~~~~~~~~~~~~~~~~~~~~~~~~~~~~~~~
I would now like to thank the following people, all in Scania
-SinXxXxX - for getting me in pq countless times(THE BEST!)
-Sh1nob1sin - for getting me in pq alot of times too (2nd best)
-one player, unfortunately i cannot remember his, he got be through a
entire pq in 16 minutes, fastest ever.
-Badboy9393 - Helps alot sometimes like in training with me. (you
might have heard of him as one of the best drop game players in
all of ms!!!)
the guild "Sacrificed" for all the good times, before and after ludi.
(and Lbaorz for making the guild)
~~~~~~~~~~~~~~~~~~~~~~~~~~~~~~~~~~~~~~~~~~~~~~~~~~~~~~~~~~~~~~~~~~~~~~~~~~~~~~~
These are people who have spotted errors or contributed useful information
after my guide was put up.
IGN's
- 150k - He provided me with the info in the 2nd area of The
"Crack in the wall" section.
- A guy provided me with the info about bandits, unfortunately he forgot to
leave his ign.
- ackmard (didnt leave ign) - he gave me a small list of scrolls I dont have
listed as prizes.
- lizzinner(msea player) - he sent in some tips about fighting alishar and
pot management.
-michael(not ign) 57 broa cleric - great info about how to kill
the indestructable king block gollems
~~~~~~~~~~~~~~~~~~~~~~~~~~~~~~~~~~~~~~~~~~~~~~~~~~~~~~~~~~~~~~~~~~~~~~~~~~~~~~~
Contact Info
~~~~~~~~~~~~~~~~~~~~~~~~~~~~~~~~~~~~~~~~~~~~~~~~~~~~~~~~~~~~~~~~~~~~~~~~~~~~~~~
If you find any errors in my guide or need anything and need to contact me,
chat invite me in game or e-mail to
Osiel.6@Gmail.com
main IGN's used are
SCANIA GLOBAL ONLY!
DarkEnemy
ShiningAlly
xShiningIcex
these IGN's are from august 30,2006, more might come which will not be
listed here, this is the last update